There’s something magical about the art of slow-cooked meat, where succulent flavors meld together, resulting in a culinary experience that is nothing short of extraordinary. And when it comes to achieving the pinnacle of perfection with Barbacoa, there’s a game-changing technique that has revolutionized the way this traditional Mexican dish is prepared – sous vide.
If you’re a food enthusiast or simply someone who appreciates the rich and bold flavors of slow-cooked meat, then get ready to embark on a culinary journey like no other. In this blog post, we will delve into the world of Barbacoa, exploring its origins and unraveling the secrets behind achieving barbacoa perfection through the sous vide method.
Traditionally, Barbacoa involved slow-cooking meat over an open fire or in an underground pit, resulting in tender, smoky, and deeply flavorful meat that melts in your mouth. But the sous vide technique, a modern culinary marvel, allows us to recreate that same incredible taste and texture with precision and consistency, elevating the Barbacoa experience to new heights.
In this post, we will guide you through the step-by-step process of preparing Barbacoa using sous vide, ensuring that every bite is an explosion of savory and aromatic bliss. From selecting the right cut of meat to the perfect blend of spices and marinades, we’ll uncover the essential components that make Barbacoa a culinary masterpiece.
Whether you’re a seasoned sous vide enthusiast or a curious cook looking to explore new culinary horizons, this guide will equip you with the knowledge and techniques to unlock the full potential of Barbacoa. Get ready to indulge in a symphony of flavors, tender textures, and unforgettable dining experiences that will leave your taste buds longing for more.
So, gather your culinary tools, prepare your appetite, and join us on this mouthwatering journey to unlock the secret to Barbacoa perfection through the transformative power of sous vide cooking. Let’s dive in and discover a whole new world of delectable delights that will have you savoring every bite and impressing your friends and family with your culinary prowess.
What Is The Speciality Of Barbacoa, And Why It Is Best Cooked Sous Vide?
The specialty of Barbacoa perfection lies in its incredibly tender, succulent, and deeply flavorful meat. The traditional method of cooking Barbacoa involves slow-roasting the meat over an open fire or in an underground pit, allowing it to gradually cook in its own juices, resulting in a rich, smoky taste. However, achieving consistent perfection with traditional methods can be challenging due to variations in heat, cooking times, and other factors.
This is where the sous vide method comes in as a game-changer. Sous vide cooking involves sealing the meat in an airtight bag and immersing it in a precisely controlled water bath at a low and consistent temperature for an extended period. This technique allows the meat to cook slowly and evenly, infusing it with flavors while retaining its moisture and tenderness.
When it comes to Barbacoa, sous vide cooking offers several distinct advantages. Firstly, it ensures that the meat is cooked evenly from edge to edge, eliminating any potential for overcooking or undercooking. This results in uniformly tender meat throughout, with no dry or tough spots.
Secondly, sous vide cooking allows for precise control over the temperature, ensuring that the meat reaches the ideal level of tenderness without exceeding it. This means you can achieve that perfect “fall-off-the-bone” texture while preserving the meat’s natural juices and flavors.
Additionally, the sous vide method enables you to infuse the meat with a blend of spices, marinades, and seasonings, which are absorbed deeply during the long cooking process. This leads to a more intense and well-rounded flavor profile, enhancing the overall taste experience of Barbacoa.
Lastly, sous vide cooking provides convenience and flexibility. With precise temperature control and extended cooking times, you can plan ahead and have your Barbacoa ready exactly when you need it. It also allows you to prepare larger batches of Barbacoa with consistent results, making it perfect for gatherings and special occasions.
In summary, the specialty of Barbacoa perfection lies in its tender and flavorful meat, and sous vide cooking is the ideal method to achieve this. By offering precise temperature control, even cooking, and the ability to infuse flavors, sous vide unlocks the full potential of Barbacoa, resulting in a culinary masterpiece that will delight your taste buds and leave a lasting impression on anyone fortunate enough to savor it.
Cooking Steps
Step 1
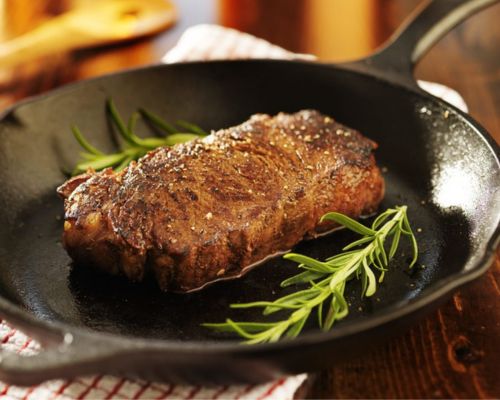
To begin the process of cooking Barbacoa to perfection using sous vide, the first step is to sear the short beef ribs. This crucial step adds a delightful caramelized crust and enhances the overall flavor of the meat. Place the skillet over medium-high heat and allow it to become hot. While the skillet is heating up, take the short beef ribs out of their packaging and pat them dry using paper towels. Ensuring that the surface of the meat is dry helps achieve a better sear. Once the skillet is adequately heated, add a small amount of oil with a high smoke point, such as vegetable or canola oil, to the pan. Swirl the oil around to coat the bottom evenly. Carefully place the short beef ribs into the hot skillet, making sure not to overcrowd the pan. Allow the short beef ribs to sear undisturbed for approximately 2-3 minutes on each side. This will create a beautiful brown crust and lock in the juices within the meat. Use tongs to carefully flip the ribs and repeat the searing process on the other side. Adjust the heat to medium if the skillet becomes too hot, or reduce it slightly if the searing is not progressing as desired. Once both sides of the short beef ribs have achieved a rich, golden-brown crust, remove them from the skillet and set them aside.
Step 2
In Step 2 of cooking Barbacoa to perfection using sous vide, it’s time to create a flavorful sauce that will infuse the short beef ribs with rich and aromatic flavors. This sauce is prepared using a combination of fancy pimentos, sofrito, chipotle chilies, adobo garlic, ground cloves, black pepper, salt, lemon, and a food processor, with the exception of bay leaves. To begin, gather all the necessary ingredients and ensure they are ready for processing. Fancy pimentos, also known as sweet or bell peppers, should be washed, seeded, and roughly chopped. Sofrito, a traditional Spanish seasoning base, can either be prepared beforehand or purchased ready-made. Chipotle chilies, which add a smoky and spicy kick, should be rinsed and seeded if desired. Adobo garlic, a mixture of garlic cloves in adobo sauce, should be prepared or purchased in advance. Next, prepare your food processor by ensuring it is clean and assembled properly. Add the chopped fancy pimentos, sofrito, chipotle chilies, adobo garlic, ground cloves, black pepper, salt, and the juice of a lemon to the food processor bowl. Make sure to exclude the bay leaves at this stage, as they will be added later during the cooking process. Once all the ingredients are in the food processor bowl, secure the lid tightly. Process the mixture until it reaches a smooth and uniform consistency. This may take a few minutes, depending on the power and speed settings of your food processor. Pause occasionally to scrape down the sides of the bowl, ensuring all ingredients are well incorporated. Once the sauce reaches the desired consistency and taste, transfer it to a bowl or container. At this point, you can add the bay leaves to the sauce, gently stirring them in.
Step 3
In Step 3 of cooking Barbacoa to perfection using sous vide, it’s time to prepare the seared short beef ribs and the flavorful sauce for the sous vide cooking process. This step involves double bagging the ribs and cooking them at a precise temperature of 185°F (85°C) for a duration of 24 hours. To begin, gather the seared short beef ribs that were set aside after the searing process in Step 1. Take the ribs and the prepared flavorful sauce from Step 2. Ensure that both the ribs and the sauce are at room temperature before proceeding. Next, prepare two food-grade, resealable plastic bags for double bagging. The double bagging technique adds an extra layer of protection and helps to prevent any leaks during the long sous vide cooking process. Place one of the plastic bags inside the other, creating a double layer. This ensures that the ribs and the sauce will be fully sealed and submerged during cooking. Open the inner bag and carefully place the seared short beef ribs inside, arranging them in a single layer. If necessary, you can use multiple bags depending on the quantity of ribs being cooked. Pour the prepared flavorful sauce over the ribs, ensuring they are evenly coated. Close the inner bag, removing as much air as possible while sealing it tightly. Then, seal the outer bag, taking care to leave a small opening for air to escape during the next step. Now it’s time to use the water displacement method to remove the remaining air from the bags. Slowly lower the bags into a container filled with water, ensuring that the opening of the bags is above the waterline. As you lower the bags, the water pressure will push the air out through the small opening. Once most of the air is expelled, carefully seal the opening, ensuring that the bags are completely airtight. At this stage, the double-bagged short beef ribs, along with the flavorful sauce, are ready for sous vide cooking. Preheat your sous vide water bath to a precise temperature of 185°F (85°C). Once the water bath has reached the desired temperature, carefully place the bags into the water, ensuring they are fully submerged. Set the sous vide timer for 24 hours, allowing the short beef ribs to cook slowly and tenderize in the controlled temperature environment. Throughout the cooking process, periodically check the water level and adjust if necessary, ensuring the bags remain fully submerged. After the 24-hour cooking time has elapsed, carefully remove the bags from the water bath. The long and slow sous vide cooking process will have transformed the short beef ribs into tender, melt-in-your-mouth perfection, infused with the flavors of the aromatic sauce. With Step 3 complete, the short beef ribs are now ready for the final step of the Barbacoa perfection sous vide recipe: serving and enjoying the delicious and tender Barbacoa.
Step 4
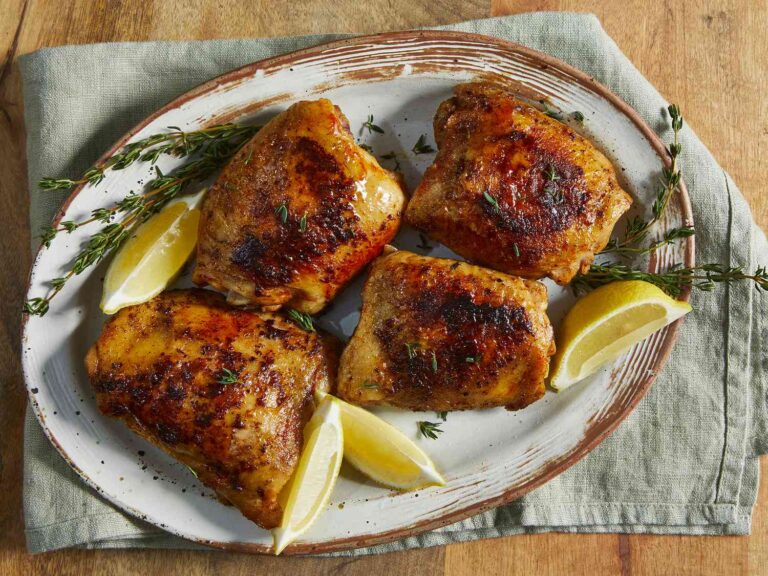
In the final step of cooking Barbacoa to perfection using sous vide, it’s time to take the tender short beef ribs out of the bags, slice them, and finish off the dish with the flavorful sauce. Carefully remove the double-bagged short beef ribs from the sous vide water bath, ensuring not to spill any of the delicious cooking juices. Gently open the bags and transfer the cooked ribs to a clean cutting board or a platter. Allow the ribs to rest for a few minutes to redistribute their juices and retain their moisture. This resting period will also make it easier to handle and slice the meat. Using a sharp knife, slice the Barbacoa into desired portions. You can choose to slice the meat thinly for a more delicate presentation or cut thicker slices for a heartier serving. Take your time and cut the meat against the grain to ensure tenderness. Once the Barbacoa is sliced, it’s time to finish off the dish with the flavorful sauce prepared in Step 2. Pour the sauce over the sliced meat, ensuring each piece is generously coated. The aromatic and tangy sauce will complement the rich flavors of the Barbacoa, adding an extra layer of depth to the dish. For presentation, garnish the Barbacoa with fresh herbs such as cilantro or parsley. This adds a vibrant touch and enhances the visual appeal of the dish. You can also serve the Barbacoa with traditional accompaniments such as warm tortillas, lime wedges, diced onions, and fresh salsa. With Step 4 complete, your Barbacoa perfection using sous vide is ready to be served and enjoyed. The tender and flavorful short beef ribs, cooked for 24 hours at a precise temperature, combined with the rich and aromatic sauce, create a truly delicious and memorable dining experience.
What Are The Some Sides For Barbacoa And How It Is Prepared?
When it comes to complementing the rich and flavorful Barbacoa, there are several sides that pair perfectly with this mouthwatering dish. Here are two popular options:
Cilantro Lime Rice
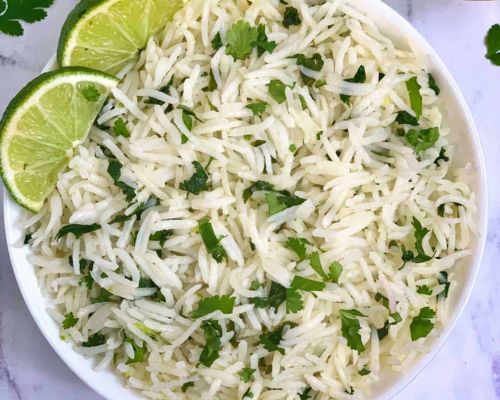
To make Cilantro Lime Rice as a side for Barbacoa, follow these simple steps:
Ingredients:
- 1 cup long-grain white rice
- 2 cups water
- 1 tablespoon butter or olive oil
- 2 tablespoons fresh lime juice
- 1/4 cup chopped fresh cilantro
- Salt to taste
Instructions:
- Rinse the rice under cold water to remove excess starch.
- In a medium saucepan, bring the water to a boil.
- Add the rinsed rice and reduce the heat to low. Cover and simmer for about 15-20 minutes or until the rice is cooked and the water is absorbed.
- Remove the saucepan from heat and let it sit, covered, for 5 minutes to allow the rice to steam.
- Fluff the rice with a fork to separate the grains.
- Add the butter or olive oil to the rice and mix well until it melts and coats the grains.
- Drizzle the lime juice over the rice and mix to combine.
- Stir in the chopped cilantro.
- Season with salt to taste. Adjust the lime juice and cilantro according to your preference.
Cilantro Lime Rice pairs well with Barbacoa, especially pork tenderloin, for several reasons:
- Flavor Enhancement: The fresh, tangy flavors of cilantro and lime complement the rich, savory taste of Barbacoa. The brightness of the cilantro and lime cuts through the richness of the meat, adding a refreshing element to the dish.
- Texture Contrast: The light and fluffy texture of Cilantro Lime Rice provides a pleasing contrast to the tender and juicy pork tenderloin. It adds a satisfying mouthfeel and balances out the overall texture of the meal.
- Balancing Heat: Barbacoa can sometimes have a spicy kick to it, and the Cilantro Lime Rice helps to mellow out the heat. The citrusy lime and the cooling effect of cilantro provide a refreshing contrast to the spiciness, creating a well-balanced flavor profile.
In terms of health benefits, Cilantro Lime Rice offers several advantages:
- Nutrient-Rich: Cilantro is a good source of vitamins A, C, and K, as well as potassium and dietary fiber. It also contains antioxidants that may have various health benefits.
- Immune-Boosting: Both cilantro and lime are known for their immune-boosting properties. They contain vitamin C, which supports the immune system and helps protect against illnesses.
- Digestive Aid: Cilantro has traditionally been used to aid digestion and promote healthy gut function. It may help alleviate digestive issues such as bloating and indigestion.
- Low Fat and Calories: Cilantro Lime Rice, when prepared without excessive amounts of butter or oil, can be a healthy side dish option. It is naturally low in fat and calories, making it suitable for those watching their weight or following a balanced diet.
Charred Corn Salad
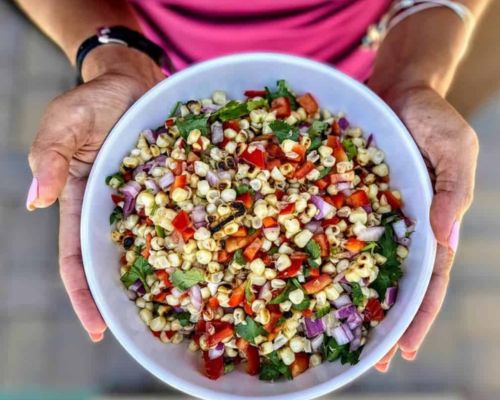
To make Charred Corn Salad as a side for Barbacoa, follow these steps:
Ingredients:
- 4 ears of fresh corn, husked
- 1 red bell pepper, diced
- 1 small red onion, diced
- 1 jalapeño pepper, seeded and diced (optional for added heat)
- 1/4 cup fresh cilantro, chopped
- Juice of 1 lime
- 2 tablespoons olive oil
- Salt and pepper to taste
Instructions:
- Preheat your grill or stovetop grill pan to medium-high heat.
- Place the corn directly on the grill and cook for about 8-10 minutes, turning occasionally, until the kernels are charred and slightly softened. Remove from the grill and let cool.
- Once the corn has cooled, cut the kernels off the cob and place them in a large mixing bowl.
- Add the diced red bell pepper, red onion, jalapeño (if using), and chopped cilantro to the bowl with the corn.
- In a small bowl, whisk together the lime juice, olive oil, salt, and pepper.
- Pour the dressing over the corn mixture and toss gently to combine, ensuring all ingredients are coated.
- Let the salad sit for about 10-15 minutes to allow the flavors to meld together.
- Taste and adjust the seasoning if needed.
- Serve the Charred Corn Salad as a refreshing side dish for Barbacoa.
Charred Corn Salad complements pork tenderloin Barbacoa for several reasons:
- Flavor Harmony: The smoky and slightly sweet charred corn enhances the rich and savory flavors of the pork tenderloin Barbacoa. The combination creates a well-rounded and satisfying taste experience.
- Freshness and Texture: The crispness of the corn kernels, along with the diced red bell pepper and red onion, adds a delightful crunch to the meal. This contrast in texture complements the tenderness of the pork tenderloin, creating a satisfying mouthfeel.
- Balanced Nutrition: Charred Corn Salad is packed with vitamins, minerals, and dietary fiber. Corn contains antioxidants and beneficial plant compounds, while red bell peppers provide vitamin C and other essential nutrients. This side dish adds nutritional value to the meal.
- Light and Refreshing: The fresh lime juice, cilantro, and vegetables in the salad bring a refreshing element to the plate. They help balance the richness of the Barbacoa, making the overall meal more enjoyable and satisfying.
Health benefits of Charred Corn Salad include:
- Dietary Fiber: Corn is a good source of dietary fiber, which aids digestion, promotes satiety, and helps maintain healthy cholesterol levels.
- Vitamins and Minerals: Corn and red bell peppers are rich in vitamins A and C, providing antioxidant benefits and supporting immune function.
- Hydration: The high water content in corn and vegetables helps keep you hydrated, especially during warm weather.
- Weight Management: Charred Corn Salad is relatively low in calories and can be a healthy option for those watching their weight or looking to maintain a balanced diet.
Remember to adjust the ingredients and seasonings according to your preferences and dietary needs. Enjoy the Charred Corn Salad alongside your Barbacoa for a delicious and nutritious meal!
How To Freeze And Reheat Barbacoa For Meal Prep?
Freezing and reheating barbacoa can be a convenient way to meal prep and enjoy this delicious dish over time. Here’s a step-by-step guide on how to freeze and reheat barbacoa for optimal results:
Freezing Barbacoa:
Cook the barbacoa: Prepare and cook the barbacoa according to your preferred recipe or method. Ensure that the meat is tender and fully cooked before proceeding.
Allow it to cool: Let the barbacoa cool down to room temperature. This step is crucial to prevent the growth of bacteria during the freezing process.
Portion the barbacoa: Divide the barbacoa into individual or meal-sized portions. This will make it easier to thaw and reheat only the amount you need at a time.
Package for freezing: Wrap each portion tightly in plastic wrap or place them in airtight freezer-safe containers or bags. Make sure to remove as much air as possible to prevent freezer burn.
Label and date: Clearly label each package with the contents and date of freezing. This will help you keep track of the storage time.
Reheating Barbacoa:
Thaw in the refrigerator: When you’re ready to enjoy the barbacoa, transfer the desired portion(s) from the freezer to the refrigerator. Allow them to thaw overnight or for several hours until completely thawed.
Stovetop method: For best results, reheat barbacoa on the stovetop. In a skillet or saucepan, warm the barbacoa over medium-low heat. You can add a splash of water or broth to prevent drying out. Stir occasionally to ensure even heating until the barbacoa reaches the desired temperature.
Microwave method: If you’re short on time, you can also reheat barbacoa in the microwave. Place the thawed portion(s) in a microwave-safe dish, cover with a microwave-safe lid or microwave-safe plastic wrap, and heat in short intervals. Stir and check the temperature between intervals to avoid overheating and ensure even heating.
Oven method: If reheating a larger quantity, you can use the oven. Preheat the oven to around 325°F (165°C). Place the barbacoa in an oven-safe dish, cover it with foil to retain moisture, and heat for approximately 20-30 minutes or until thoroughly heated. Stir occasionally to promote even heating.
Remember to always check the internal temperature of the barbacoa before consuming. It should reach 165°F (74°C) to ensure it’s safe to eat. Enjoy your reheated barbacoa with your favorite sides and toppings!
Conclusion
In conclusion, cooking barbacoa to perfection using the sous vide method is a game-changer for anyone who wants to elevate their culinary skills and experience the ultimate tenderness and flavor in this traditional Mexican dish. By immersing the seasoned meat in a precisely controlled water bath for an extended period, the sous vide technique ensures that every fiber is infused with the delicious blend of spices and that the meat reaches the ideal temperature for succulent results. The low and slow cooking process guarantees that the barbacoa turns out moist, tender, and full of rich flavors, ready to be enjoyed in tacos, burritos, or any other creative dishes. With sous vide, you have the power to consistently create barbacoa perfection, making it an impressive addition to your cooking repertoire that will leave your taste buds craving for more. So, grab your sous vide equipment, embrace this revolutionary method, and savor the mouthwatering delight of barbacoa made to absolute perfection.